Thursday, May 30, 2013

TECHNIQUES IN CHOCOLATE

May 30, 2013

After making molded candies yesterday, we moved on to other chocolate confections such as truffles and candied orange peel. My team was assigned to make marshmallow. This was a good learning experience for me as I completely messed up the first batch and had to make it over again.


What I learned was that you beat the egg whites with only a little bit of the granulated sugar.  I poured all the granulated sugar into the egg whites. This does not allow the egg whites to whip up to the proper consistency.  Also the formula required water and sugar be heated between 240 and 265 degrees.  I put the corn syrup in the water and heated the mix. Without having any of the granulated sugar in the water mixture, the mixture simply just boiled down and would not reach the required temperature.  


Second time round, a small amount of sugar went into the egg whites, the rest into the corn syrup, water mixture and everything turned out great in the end.  It tastes just like the marshmallows bought from the store. 


I also was able to work with gelatin sheets, which I have never used before. These were soaked in water for 5 to 8 minutes and then once the sheets absorbed the water, the water was squeezed out by hand and added to the egg white, sugar syrup mixture.  


After the marshmallow was made and piped, we moved on to the next chocolate. We took some of the hazelnut ganache that was left over from yesterdays chocolates  candies and mixed with more chocolate. Then we piped them into strips on a tray and added a macadamia nut to the top. We tempered more dark chocolate. Then rolled the piped ganache in the chocolate, removed with a dipping fork on to a parchment tray, and applied a transfer sheet strip on top. Removing the ganache from the chocolate with the dipping fork and placing on the tray without it having feet (excess chocolate that forms at the bottom when placed on the tray) or marks all over the chocolate was quite a challenge. After doing a tray full though, I was beginning to get the hang of it. 

Different candies, truffles, and other confections were made by each team and in the end we had a wide variety of chocolates. 

Pistachio Covered Truffles, Chocolate Clusters, and Pona (Orange Cream-Filled Chocolates) 


Chocolate Covered Orange Peel and Coconut and Almond Covered Truffles


Samba (Anise Ganache and Nougatine), Vioni (Milk Chocolate and Vanilla Square), and  Nut Clusters (nitrogen mist in background)

Havana (Milk Chocolate  Rum Ganache), Caravelle (Marzipan, Raspberry and Hazelnut Chocolates), and Seville (Milk Chocolate, Hazelnut, and Orange Ganache Chocolates)


A chocolate display was created for the window and of course we were each able to take some home to enjoy.


Wednesday, May 29, 2013

TECHNIQUES IN CHOCOLATE

May 29, 2013


We were in the kitchen making chocolates. Each team was assigned a different chocolate to make. We started by selecting the chocolate mold we wanted to use to make our chocolates.  My team was assigned the Faun which is a Hazelnut Ganache Chocolate. As our formula made 56 candies, we selected 3 different molds to make the chocolates (each mold only having 24 candies).  


The process for making chocolates was first to temper the chocolate.  The formula called for dark chocolate. Each chocolate (dark, milk, and white) has a different tempering temperature.  For dark chocolate, we melted the chocolate on a low temperature (double boiler), warmed it to 118 degrees, and then used the seeding method to temper the chocolate down to 89 degrees. This involves adding small pieces of unmelted chocolate to the melted chocolate and stirred until you reach the tempered temperature (it is 2/3 melted chocolate to 1/3 unmelted chocolate ratio). 

Two lessons learned here regarding the chocolate for making chocolate confections:

1. The chocolate must be a very smooth consistency. If using the seeding method, make sure your seeds (the unmelted chocolate) are cut into small bits and added immediately after you reach 118 degrees to ensure they will get completely melted to a smooth texture.  We left the seeds whole as shown in this picture and did not add them all right away.  This results in us fishing out the unmelted seeds out of the chocolate and not having as smooth of texture as needed.

2. The best method to use for tempering chocolate for chocolate confections is the block method.  This is where an unmelted block of chocolate is added to the melted chocolate and stirred until it reaches the tempered temperature. This pretty much ensures a smooth texture and once you reach the tempered temperature, you just remove the remaining portion of the block. 

After our tempered chocolate was ready, we poured it into the mold.  Once each mold is filled we scrapped the excess chocolate off the top and sides of mold.  After waiting for a minute, we then dumped the chocolate out of the mold back into the bowl and then scraped the top off again while holding upside down. We then placed the mold upside down on a parchment paper.  This creates a thin lining of chocolate on the inside of the mold and creates a small ridge at the base where the chocolate sits on the parchment.   After this dried, we turn the mold over and scrapped any remaining chocolate off the top of the mold.   


The mold was ready for filling. We made the hazelnut ganache by melting milk chocolate and mixing in a hazelnut paste. As we need to use the tempered chocolate to complete the chocolates, we had to continue to keep the tempered chocolate in temper until we were ready to complete the chocolate molds. This is not allowing the chocolate to fall below 83 degrees or warming above 90 degrees. 


As soon as the chocolate hazelnut filling was cooled, we filled the chocolate molds by piping the filling into the chocolate lined molds up to 1/16 of the top of the mold.  Then waited for the filling to set.


After the filling was set we poured the tempered chocolate over the filled molds and then scrapped the excess chocolate off the mold.  


After the chocolate set, we scrapped the mold one last time to remove any excess chocolate on the mold. Then we turned the molds over on to a parchment tray.  We lifted the mold and hit it hard one time down on the tray and the chocolates fell out. The process for making chocolate candies was messy and by the end of the class, my arms were very tired from continually stirring chocolate. I basically  stirred and warmed chocolate for 4 hours with a few little breaks in between.  

Tuesday, May 28, 2013

TECHNIQUES IN CHOCOLATE

May 28, 2013


We discussed  Cacao trees, their pods and beans. The trees are grown in area that are between 10 degrees north and south of the equator. Each cacao pod contains 40 to 50 beans. It takes approximately 110 to 150 beans to make 1 pound of chocolate.


We also discussed the eleven steps of chocolate production, from harvesting to final shaping.   Once we reviewed the steps of production, we moved on to chocolate truffles and the procedures for making truffles. Tomorrow we will be making truffles along with other chocolate confections. 


Monday, May 27, 2013

TECHNIQUES IN CHOCOLATE

May 27, 2013

Today I made Chocolate Butter Cupcakes with Butter Cream Frosting, yum!


Thursday, May 23, 2013

TECHNIQUES IN CHOCOLATE

May 23, 2013

We completed assembly of the chocolate centerpiece.  First we started by tempering dark chocolate and assembling the base structure. 


Then we tempered white chocolate and assembled the flower and made leaves.


We then assembled and added the pedestal to the base structure for the flower to attach.


The Chef then sprayed the structure with a chocolate coating to smooth everything out. 


It was then set aside for the coating to dry. 


While waiting we completed other elements for finishing the centerpiece. These pieces were made of white chocolate and colored cocoa butter.


After the coating was dry we attached the flower to the pedestal.


Then the finishing elements were added for completion.


The completed centerpieces were put on display in the window.


Wednesday, May 22, 2013

TECHNIQUES IN CHOCOLATE

May 22, 2013


We were in the kitchen tempering chocolate today. Now I completely understand why many cannot temper chocolate properly. It was very helpful to have someone who knows what they are doing when it comes to tempering chocolate so they can show you how it is done and tell you how to fix it when it is wrong. Yes, we had to re-temper the white chocolate.  It is definitely a workout for your arms and shoulder blades.

We started off with the design concept for a centerpiece. We brought poster board to cut templates out for the pieces that we would be cutting from the tempered chocolate.  We will be doing a dark chocolate stand with three large wavy thin leaves flowing upward from the stand and a white chocolate flower in the center of the leaves.  This is difficult to explain without seeing a visual but I will take a picture when it is complete.  

Today we made the chocolate stand, leaves, and flower pedals.  Tomorrow we will be tempering more chocolate, completing the remaining pieces, and assembling the centerpiece. 

Tuesday, May 21, 2013

TECHNIQUES IN CHOCOLATE

May 21, 2013


We reviewed the methods of tempering chocolate again in class (as we will be doing this tomorrow in the kitchen) and then moved on to market forms of chocolate and indicators of quality chocolate. 

The first market form of chocolate that we talked about was unsweetened, bitter and baking chocolate.  The Chef went and got some crushed cocoa nibs and put a nickel size amount in each of our hands.  We were then instructed on the count of three to all put the nibs in our mouths at the same time.  The Chef thought he was quite funny as he faked putting it in his mouth as we did in ours.  At first it tasted a little like bitter chocolate but than as you continued to chew, it became very bitter and not a good taste.  Many of the students ended up spitting them out.  This is why the addition of some sugar is necessary.


We discussed couverture (ku-ver-tuer), which means to cover or coat in French.  It contains a higher percentage of cocoa butter used for molding, praline, candies, showpieces, dipping and coating truffles (yum).


After discussing the different market forms we moved on to indicators of quality chocolate.  These are aroma, appearance, melting point, snap, and taste.  We also discussed storage of chocolate.  The three enemies of chocolate are water, heat, and sunlight.  This is why you see chocolate wrapped in foils as this helps minimize sunlight exposure.  


Monday, May 20, 2013

TECHNIQUES IN CHOCOLATE

May 20, 2013


The first day of chocolate class was awesome! I really like the Chef and his teaching style. I think I am going to enjoy this class.  He has a great sense of humor and has already handed out chocolate for us to nibble on while he taught us.  How great is that? Although this class should be fun, it will definitely be a challenge for sure. We will be doing chocolate confections, a showpiece, frozen desserts and plated desserts along with a molecular gastronomy lab.


This week we are covering tempering chocolate for the entire week.  Apparently this is quite difficult as it is an exact science and most individuals cannot temper chocolate properly.  I can attest to this as I have tried before after reading and watching videos and was unsuccessful at it.   After this course though, I should have it down as we will be doing quite a bit of it for the next 6 weeks.


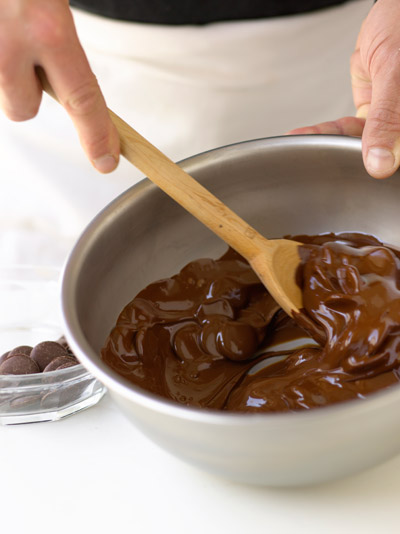
The purpose of tempering chocolate is that if it is not tempered the fat (cocoa butter) in the chocolate will bloom (a white discoloration on the surface) and the chocolate would feel oily and melt when it is touched.  None of this means the chocolate is bad or tastes bad, it is just less appealing to look at and messy to touch.  The white discoloration on the surface is made up entirely of cocoa butter that has re-solidified in an undesirable crystal form.  It can be fixed by simply re-tempering the chocolate properly.  Well tempered chocolate will have good snap, will retract, and have a permanent shine.

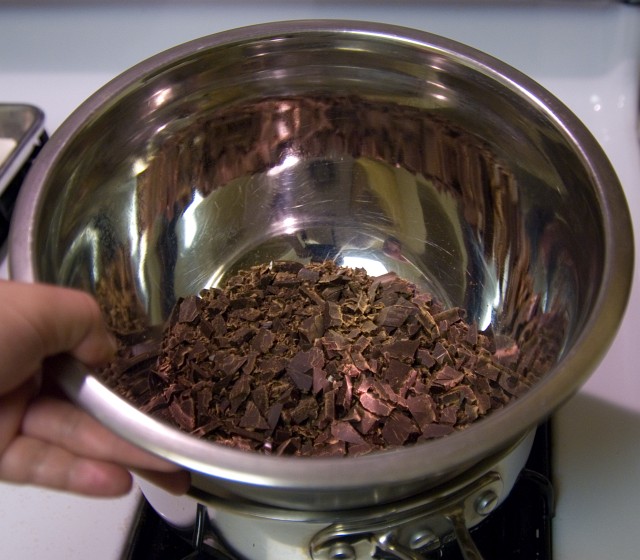
One of the keys to tempering chocolate is to warm the chocolate slowly to the correct melting temperature without going past the appropriate temperature (within 2 degrees). Each of the chocolates (dark, milk, and white) have a different specific melting temperature (118, 106 and 104 respectively) and tempered temperature (89, 86, and 84).  
There are 4 different methods for tempering chocolate (seeding, block, microwave, and table).  We will be learning each of these methods, although microwave is not really considered tempering the chocolate and if you mess it up, you have to temper by one of the other tempering methods. 


We have already been tasks with several challenges for this class. The first is that our chef jackets and aprons are to remain clean without chocolate on them.  Keep in mind these are both white.  I already know that this will be quite difficult based on my experience in the Intro to Baking class and we did not even work with chocolate every day in the kitchen. 


Second, we are not to use the word "heat" with the word "chocolate" in the same sentence.  Heating chocolate is bad, warming is good.  Myself and several others in the class have already broken this rule while asking questions.  Today we were give a pass but I think he said he would be deduct points after today. 


Third, we will be memorizing different formulas and ratios throughout the course.  Today was Ganache, yum.  We are to memorize the following ratios for Ganache: 

Dark Chocolate: 1 part cream - 1 part chocolate
Milk Chocolate: 1 part cream - 2 parts chocolate
White Chocolate: 1 part cream - 3 parts chocolate

If the chocolate ratio is more than the cream, always melt the chocolate first.

Fourth, if you have perfect attendance, you do not have to take the final written exam.  I am all for this one!


Thursday, May 16, 2013


BAKING AND PASTRY TECHNIQUES

May 16, 2013

The final day of Intro to Baking and Pastry class has arrived.  We were scheduled to present our plated dessert to the class that we had drawn in our workbooks, review for our final written test, and then take the exam.  


Unfortunately,  we did not put enough water on the floors in the kitchen from the clean yesterday (we are required to pour buckets of water on the floors after scrubbing so that the flour floats on top of the water to the drains) and so we had to take everything back out of the kitchen and re-clean the floors.  


After the cleaning was complete, we presented our plated desserts to the class. We described our dessert and then we were required to walk slowly down the aisle and show off our drawing.  I presented mine in the "Vanna White" fashion with the hand slowly moving under the drawing as I walked down the aisle. This was a good approach as we all laughed and enjoyed. My dessert was a Chocolate Raspberry Torte (a dark chocolate sponge cake with a layer of ganache and a layer of raspberry filling topped with a shiny chocolate glaze, fresh raspberries and a chocolate disk along with a side of raspberry and chocolate sauce).  Below is a picture of my plate presentation.


After presentations, we completed review and were given our final written exam. I did well on the written exam. This course was extremely stressful for me so I am completely relieved and overjoyed to have made through the class. Time for a little R&R this weekend before the next class starts on Monday. Chocolates up for the next 6 weeks. Whoo hooo!


Wednesday, May 15, 2013


BAKING AND PASTRY TECHNIQUES

May 15, 2013

Our agenda today was a thorough cleaning of the kitchen.  Each student was assigned a different task to complete.  Mine was cleaning all the Kitchen Aid mixers, the cake turn tables, and shelving unit that they sit on.  It basically took about 3 hours to complete this task.  The last half hour was spent helping others in the kitchen complete their assigned tasks.


Tuesday, May 14, 2013


BAKING AND PASTRY TECHNIQUES

May 14, 2013

Today was the practical exam.  I started out strong with completing my sponge cake and getting it into the oven right away.  The sponge cake I made yesterday turned out great. Unfortunately, 10 other people put there cake into the deck oven after my cake was already in the oven.  By the time it was ready to come out of the oven, the cake had completely fallen and I had to remake the cake. You would think the second time would be a great, but I was afraid to over mix it, have the foam deflate or the cake fall again, so I of course ended up not mixing the flour in enough and the cake had small chunks of flour in it when it was complete.  No time to make this one a third time.


Second up, I made the Vanilla Cream Sauce. This sauce is required to make the Bavarian Cream so it had to be completed in the beginning and slightly cooled so that the Bavarian would be mixed appropriately and have time to set.  We were required to have exactly 8 oz, have it taste good and achieve nappe (ability to coat the back of a spoon).  I completed the sauce with no problems and received 100 on this test item.


Then I made the Pizza Dough. There was no formula to follow for this item.  We were to eyeball the ingredients, 100% flour, 50% water and .25 salt.  She gave us some leeway with this item.  I had to go back to her 3 times with my dough before she said it was good.  Each time she gave me pointers on how to achieve the right dough.  A key piece with this dough is to bench rest the dough before presenting. Now I know how what the dough should look and feel like when it made properly.  


By this time, my Vanilla Sauce was a good temperature so I made the Bavarian Cream.  We had never work with or reviewed gelatin in class and this formula called for us to use gelatin.  Now I made the Bavarian Cream at home yesterday so I was confident this would turn out perfect, no problems. Boy, was I wrong!  I did not melt the gelatin after it bloomed before adding to my Vanilla Sauce and cream did not set properly. Unfortunately messing up on the Bavarian Cream there is no redo since we made just enough Vanilla Sauce for the Bavarian formula. As I waited in line in a hot kitchen with a half set Bavarian Cream, I watched my cream completely melt before my eyes into a pool of sauce on my plate, lol.  I did not want to present this to the Chef, but had no choice.  Even though it was a pool of cream with raspberry sauce blended in with a small dollop of whipped cream and sliced strawberry in the middle of the sauce, it looked good enough to eat. We tasted it and it had good flavor.  I ended with an 80 on this part of the test. No pictures were taken of my failed Bavarian, but below is a picture of the Bavarian I made at home that turned out great.


We had 20 minutes left in class to wrap up our presentations.  I scaled my pie dough, cut the butter  in, mixed the dough and kneaded in record time and put in the refrigerator to cool. After cleaning up my station, I present my dough to the Chef.  It was required to be 10 oz and needed to see the butter throughout as it was a flaky dough formula.  She examined the dough and I received 100 on this item.


In the end, even though I messed up with 2 of the 5 items, I still walked away with a good grade.  Some of the students did not complete all 5 items and received zeros for uncompleted items.  I am very relieved to be complete with this test!