May 29, 2013
Two lessons learned here regarding the chocolate for making chocolate confections:
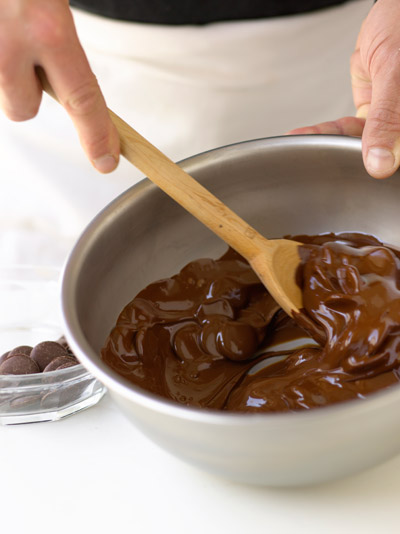 1. The chocolate must be a very smooth consistency. If using the seeding method, make sure your seeds (the unmelted chocolate) are cut into small bits and added immediately after you reach 118 degrees to ensure they will get completely melted to a smooth texture. We left the seeds whole as shown in this picture and did not add them all right away. This results in us fishing out the unmelted seeds out of the chocolate and not having as smooth of texture as needed.
 2. The best method to use for tempering chocolate for chocolate confections is the block method. This is where an unmelted block of chocolate is added to the melted chocolate and stirred until it reaches the tempered temperature. This pretty much ensures a smooth texture and once you reach the tempered temperature, you just remove the remaining portion of the block.
  After our tempered chocolate was ready, we poured it into the mold. Once each mold is filled we scrapped the excess chocolate off the top and sides of mold. After waiting for a minute, we then dumped the chocolate out of the mold back into the bowl and then scraped the top off again while holding upside down. We then placed the mold upside down on a parchment paper. This creates a thin lining of chocolate on the inside of the mold and creates a small ridge at the base where the chocolate sits on the parchment. After this dried, we turn the mold over and scrapped any remaining chocolate off the top of the mold.
 As soon as the chocolate hazelnut filling was cooled, we filled the chocolate molds by piping the filling into the chocolate lined molds up to 1/16 of the top of the mold. Then waited for the filling to set.
After the filling was set we poured the tempered chocolate over the filled molds and then scrapped the excess chocolate off the mold.

After the chocolate set, we scrapped the mold one last time to remove any excess chocolate on the mold. Then we turned the molds over on to a parchment tray. We lifted the mold and hit it hard one time down on the tray and the chocolates fell out. The process for making chocolate candies was messy and by the end of the class, my arms were very tired from continually stirring chocolate. I basically stirred and warmed chocolate for 4 hours with a few little breaks in between.
No comments:
Post a Comment